> ## Documentation Index
> Fetch the complete documentation index at: https://easymate.ai/docs/llms.txt
> Use this file to discover all available pages before exploring further.
# Wix
> Add your Sales Assistant chat widget to a Wix site with Custom Code, so it appears across your published site.
This guide shows how to put your Sales Assistant on a Wix site as a chat widget, so it appears across your whole site.
Before you start, [launch your Sales Assistant and copy your install snippet](/docs/solutions/sales-assistant/deploying/overview). Keep it on your clipboard, you'll paste it in below.
Custom code runs on your **published** site, not the editor preview. If you're on Wix's free plan, you may need to upgrade for custom code to take effect on your live site.
## Add the snippet with Wix Custom Code
Wix has a built-in **Custom code** area that injects code site-wide. This is the right tool for a chat widget, because it loads on every page.
1. Go to your **Wix dashboard** and open **Settings** (left menu).
2. Under **Development & integrations**, click **Custom code**.
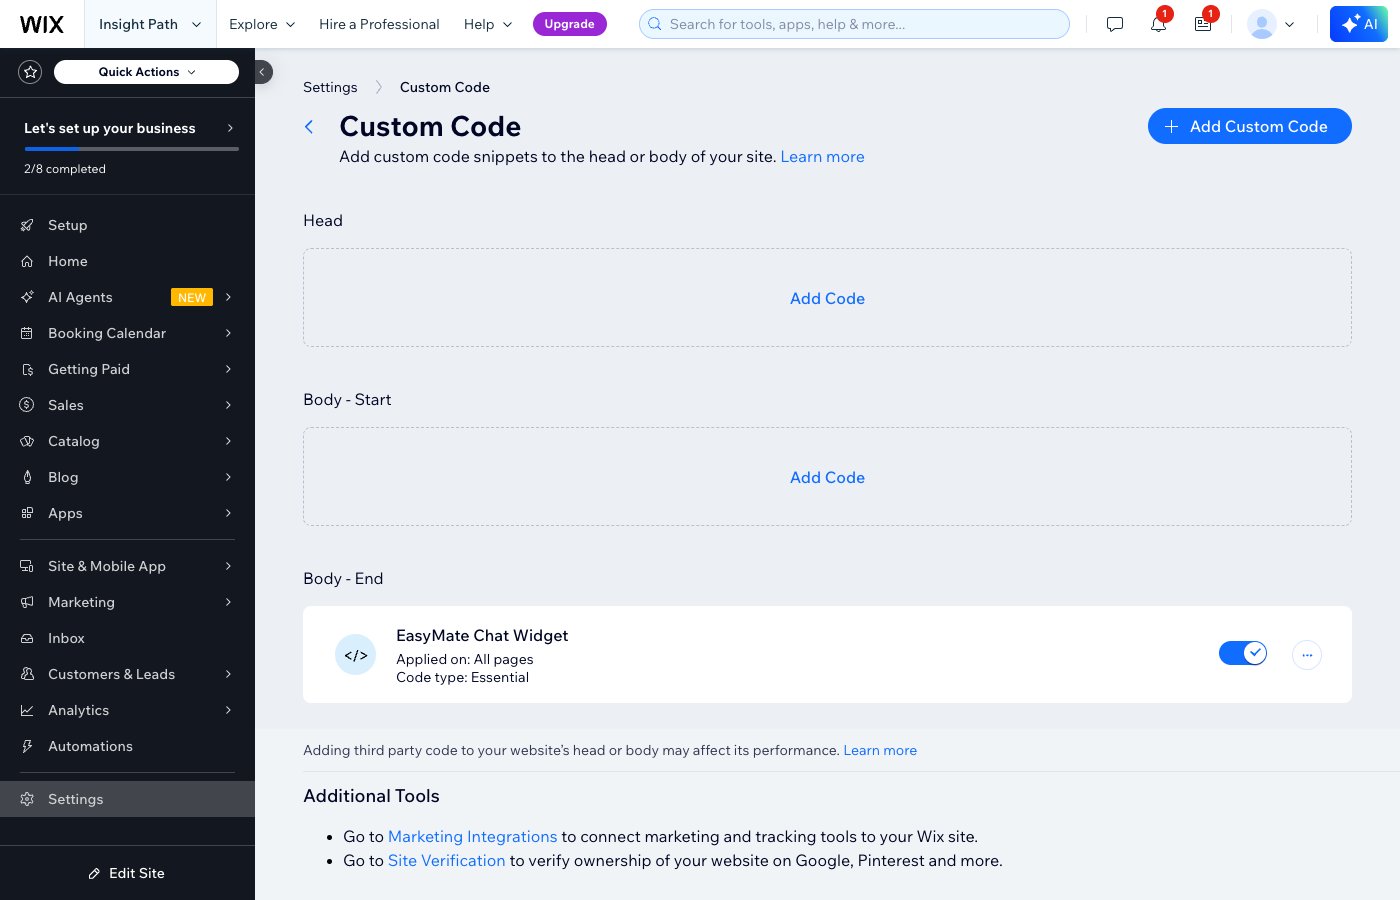 3. In the **Body - End** section, click **Add Code**.
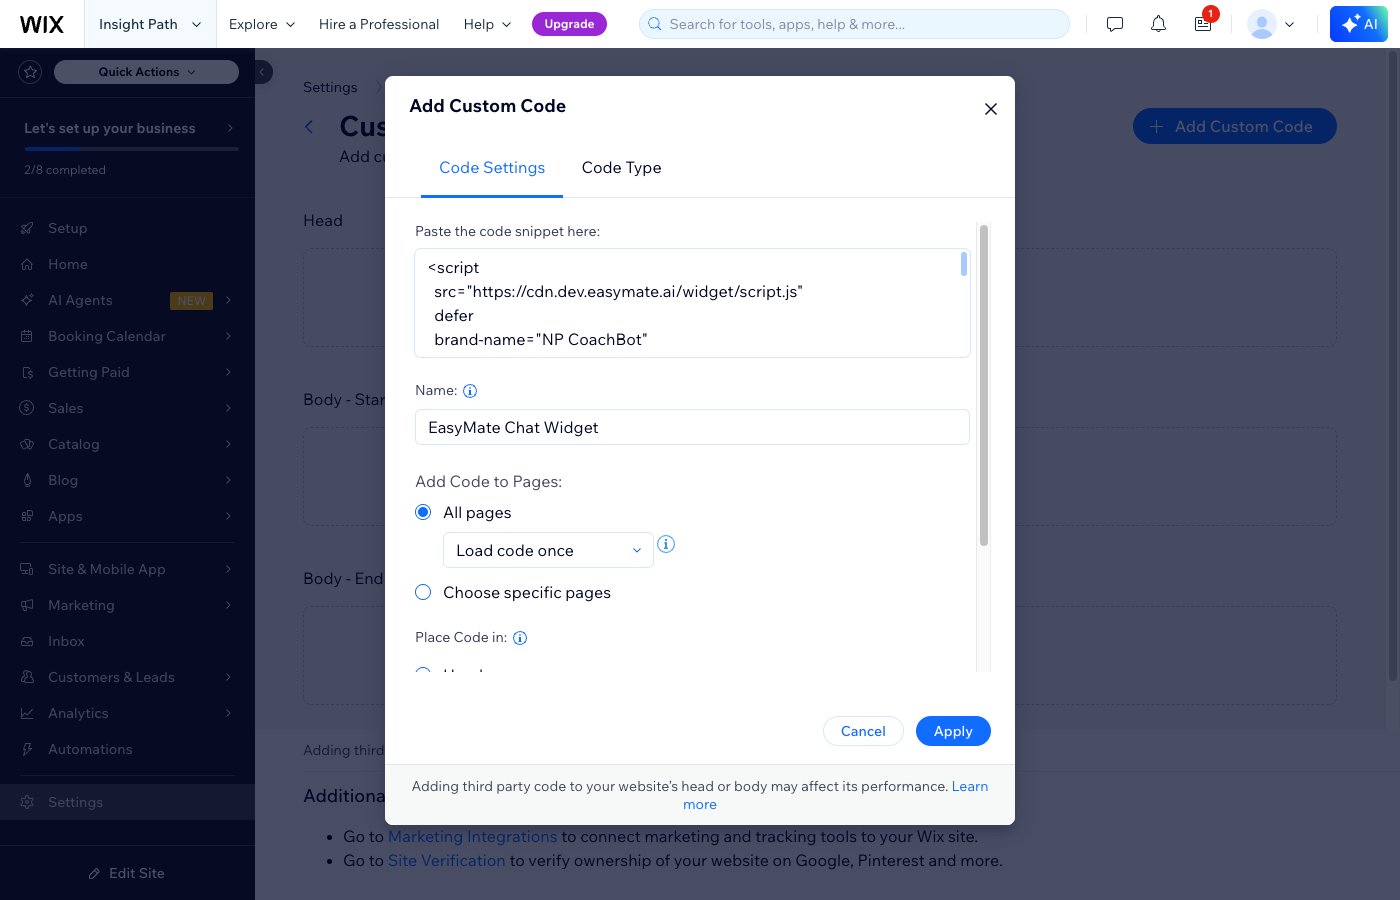
4. Paste your EasyMate snippet into the code box.
5. Give it a name you'll recognize, for example `EasyMate Chat Widget`.
6. Under **Add Code to Pages**, choose **All pages** and **Load code once**.
7. Make sure **Place Code in** is set to **Body - End**.
8. Click **Apply**.
3. In the **Body - End** section, click **Add Code**.
4. Paste your EasyMate snippet into the code box.
5. Give it a name you'll recognize, for example `EasyMate Chat Widget`.
6. Under **Add Code to Pages**, choose **All pages** and **Load code once**.
7. Make sure **Place Code in** is set to **Body - End**.
8. Click **Apply**.
 **Why "Body - End"?** The widget needs to load after your page content. Placing it at the end of the body is the most reliable spot.
## A note on the "Embed HTML" element
Wix also has an **Embed HTML / iframe** element you can drag onto a page. **Don't use that for the chat widget.** It traps the widget inside a small box on a single page. The Custom Code method above is what makes the chat button float on every page.
## Verify it's working
1. **Publish** your Wix site (custom code only runs on the live, published site, not the editor preview).
2. Open your live site in a new browser tab.
3. Look for the chat button, usually in a bottom corner, and send a test message.
If it doesn't appear, see [Troubleshooting](/docs/solutions/sales-assistant/deploying/troubleshooting).
**Why "Body - End"?** The widget needs to load after your page content. Placing it at the end of the body is the most reliable spot.
## A note on the "Embed HTML" element
Wix also has an **Embed HTML / iframe** element you can drag onto a page. **Don't use that for the chat widget.** It traps the widget inside a small box on a single page. The Custom Code method above is what makes the chat button float on every page.
## Verify it's working
1. **Publish** your Wix site (custom code only runs on the live, published site, not the editor preview).
2. Open your live site in a new browser tab.
3. Look for the chat button, usually in a bottom corner, and send a test message.
If it doesn't appear, see [Troubleshooting](/docs/solutions/sales-assistant/deploying/troubleshooting).