> ## Documentation Index
> Fetch the complete documentation index at: https://easymate.ai/docs/llms.txt
> Use this file to discover all available pages before exploring further.
# WordPress
> Add your Sales Assistant chat widget to WordPress using a header/footer plugin, a theme footer file, or a single-page block.
This guide shows how to put your Sales Assistant on a WordPress site as a chat widget, so it appears on every page.
Before you start, [launch your Sales Assistant and copy your install snippet](/docs/solutions/sales-assistant/deploying/overview). Keep it on your clipboard, you'll paste it in below.
## Which method should I use?
WordPress gives you a few ways to add custom code. We recommend the plugin method, because it works on any theme and survives theme updates.
| Method | Best for | Notes |
| -------------------------------------- | ------------------------------- | --------------------------------------------------- |
| **Header/footer plugin** (recommended) | Everyone | Site-wide, survives theme updates, no code editing. |
| **Theme footer file** | Comfortable editing theme files | Site-wide, but can be lost when the theme updates. |
| **Custom HTML block** | A single page only | The widget only appears on that one page. |
**WordPress.com vs WordPress.org.** These steps apply to self-hosted WordPress (WordPress.org) and to WordPress.com sites on the **Business plan or higher**, which is the level that allows plugins and custom code. Lower WordPress.com plans don't allow custom scripts.
## Method 1: Header/footer plugin (recommended)
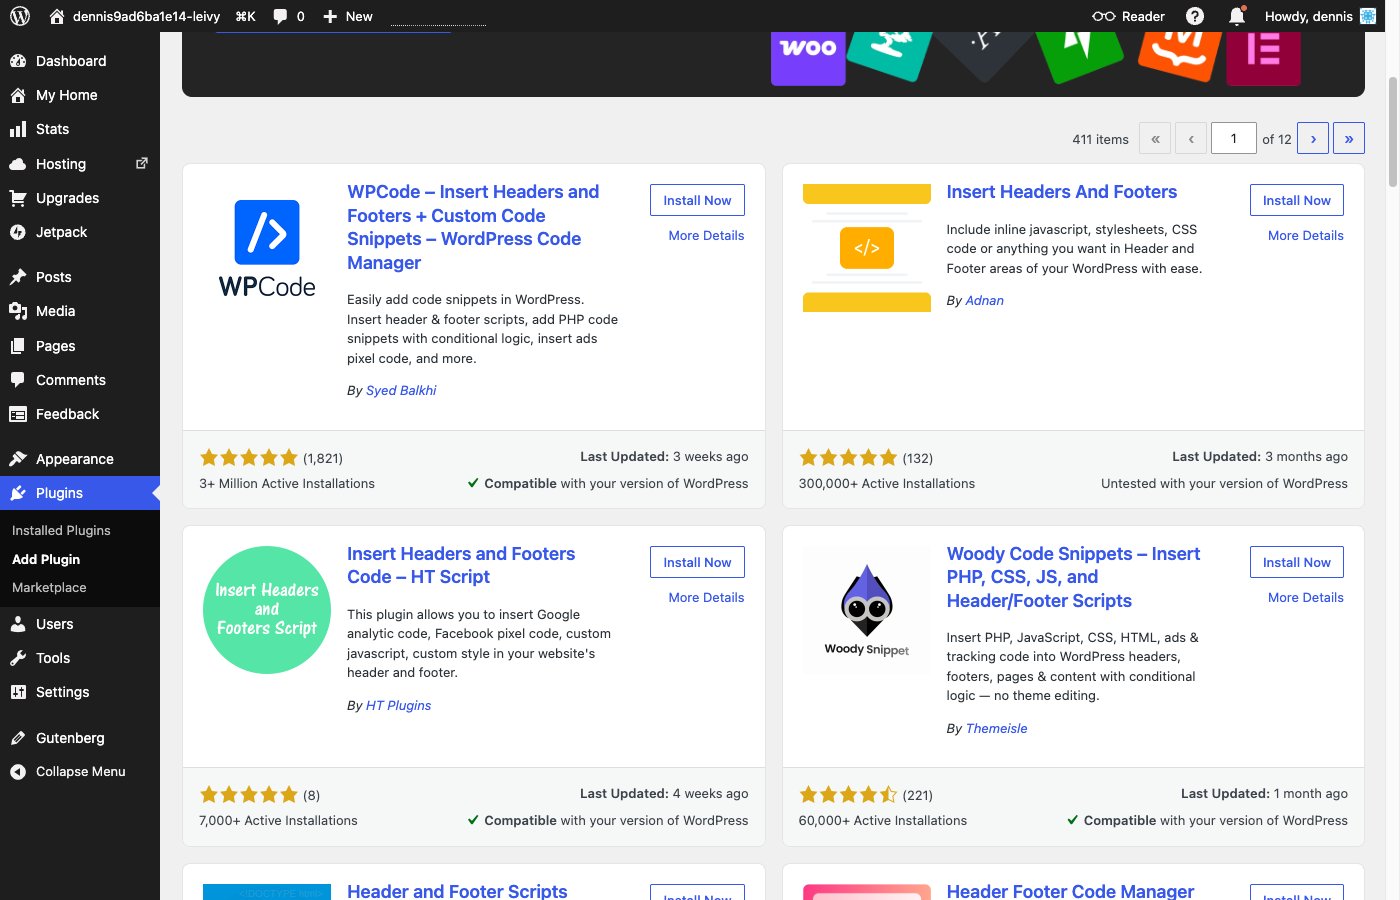
1. In your WordPress dashboard, go to **Plugins**, then **Add New**.
2. Search for **Insert Headers and Footers**. The top result is **WPCode** (Insert Headers and Footers + Custom Code Snippets).
3. Click **Install Now**, then **Activate**.
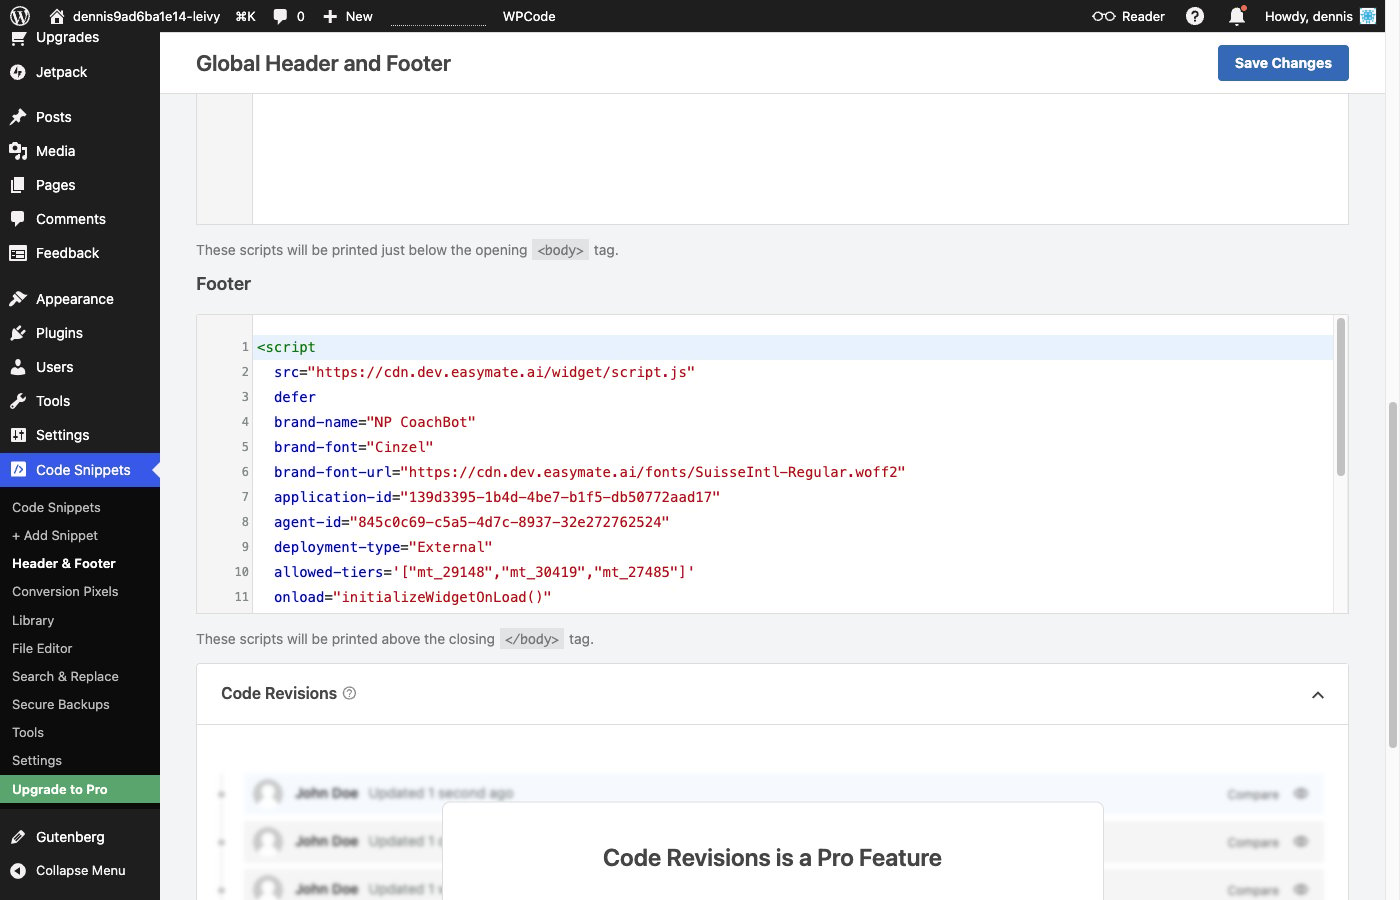
 4. In the left menu, go to **Code Snippets → Header & Footer**.
5. Paste your EasyMate snippet into the **Footer** box. It loads after your page content, the most reliable spot for a chat widget.
6. Click **Save Changes**.
4. In the left menu, go to **Code Snippets → Header & Footer**.
5. Paste your EasyMate snippet into the **Footer** box. It loads after your page content, the most reliable spot for a chat widget.
6. Click **Save Changes**.
 Visit your site and you should see the chat button appear.
## Method 2: Theme footer file
Editing theme files directly can break your site if done incorrectly, and your changes may be erased when the theme updates. Use a child theme if you can, and back up first.
1. Go to **Appearance → Theme File Editor**.
2. In the list of theme files, open **`footer.php`**.
3. Find the closing **``** tag near the bottom.
4. Paste your EasyMate snippet **immediately before** ``.
5. Click **Update File**.
## Method 3: Single page only (Custom HTML block)
Use this only if you want the chat on one specific page.
1. Edit the page in the block editor.
2. Add a **Custom HTML** block.
3. Paste your EasyMate snippet into the block.
4. Update the page.
## Verify it's working
1. Open your site in a new browser tab (or an incognito window).
2. Look for the chat button, usually in a bottom corner.
3. Click it and send a test message.
If it doesn't appear, see [Troubleshooting](/docs/solutions/sales-assistant/deploying/troubleshooting).
Visit your site and you should see the chat button appear.
## Method 2: Theme footer file
Editing theme files directly can break your site if done incorrectly, and your changes may be erased when the theme updates. Use a child theme if you can, and back up first.
1. Go to **Appearance → Theme File Editor**.
2. In the list of theme files, open **`footer.php`**.
3. Find the closing **``** tag near the bottom.
4. Paste your EasyMate snippet **immediately before** ``.
5. Click **Update File**.
## Method 3: Single page only (Custom HTML block)
Use this only if you want the chat on one specific page.
1. Edit the page in the block editor.
2. Add a **Custom HTML** block.
3. Paste your EasyMate snippet into the block.
4. Update the page.
## Verify it's working
1. Open your site in a new browser tab (or an incognito window).
2. Look for the chat button, usually in a bottom corner.
3. Click it and send a test message.
If it doesn't appear, see [Troubleshooting](/docs/solutions/sales-assistant/deploying/troubleshooting).